piLagTester PRO order page
The piLagTesterPRO measures your monitor's input lag and response time. It is a cheap, full featured add-on to the Raspberry Pi; I provide the sensor and required software, you provide the Pi (a $5 pi Zero is more than sufficient). Although it has a DIY aesthetic, it is quite functional and in fact offers quite a lot more features than the commercial alternatives (Leo Bodnar and the Time Sleuth), and has been tested with over 40 TVs, including 4k models.
Here's what it looks like in action:
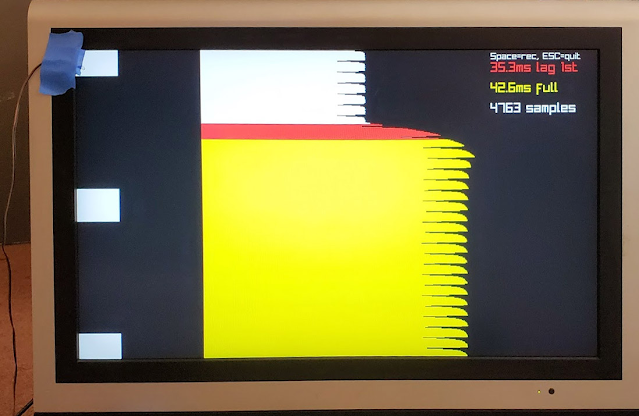
The pi draws a black background, and then roughly once a second displays a set of target rectangles (top/middle/bottom). You place the sensor over the desired target, and the piLagTester measures the monitor's response starting from the moment the frame of video data is sent over the Pi's HDMI port. This is plotted in the graph, which is sideways for space reasons.
The lag tester measures two thresholds. In red it shows how long it takes for the monitor to start displaying the target rectangles (input lag). In yellow it shows how long it takes to finish drawing them at full brightness (response time). These thresholds are printed at right and also used to color the graph: white for when the monitor has not responded at all, red for when the monitor starts to respond (input lag), and yellow for when the display has finished drawing the targets at their full brightness (full response). To get the response time quoted in monitor spec sheets subtract input lag from full response.
Also visible in the yellow zone is the overshoot/overdrive response: once the white target has reached full brightness it begins to fade somewhat. Most displays have this issue, but low quality ones have it much worse.
I use a 5% increase in brightness as the threshold for detecting the initial response; this corresponds roughly with what other input lag testers use. But it is not that salient to your eyes; you might prefer to know when the monitor has actually finished drawing the input, which is why being able to measure the response time as well is very important.
The 5% threshold for input lag and the threshold for response time, which defaults to 80%, are both user adjustable.
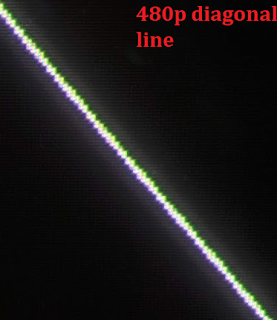
For more advanced users, the software also dumps the raw measurement values to disk allowing offline calculations and publication quality graphs, such as the following example:
 I use Octave on my desktop PC to plot the data; if you are happy with my defaults no programming is required to produce the above figure using the example code provided. Octave is free and available for all the OSes. Or if you want to make completely custom plots you can export the raw data to CSV format suitable for loading by Excel, etc.

I provide everything you need except the Pi. You just plug the ribbon cable into the GPIO header on your Pi, and position the light sensor on your TV. The light sensor is attached to the blue rectangle of tape. Let's get a close up of the sensor in action:

Because it is just a photodiode on a wire, it's very light (is that a pun?), which means it can easily be held in place with tape at the edge of the screen. This is much more handy than the TimeSleuth or Leo Bodnar because you can leave our sensor attached while you fuss with settings on your monitor/deinterlacer/whatever and find out what combination produces the least input lag or response time. In my experience a single piece of 3M blue tape will last about 30-50 applications before it starts to fail if you carefully keep it clean.
Once you get the hardware use the following links (aka the online manual) to learn how to use it:
There are also some videos of the lag tester. This one shows the hardware and light sensor placement.
The hardware
Because it is just a photodiode on a wire, it's very light (is that a pun?), which means it can easily be held in place with tape at the edge of the screen. This is much more handy than the TimeSleuth or Leo Bodnar because you can leave our sensor attached while you fuss with settings on your monitor/deinterlacer/whatever and find out what combination produces the least input lag or response time. In my experience a single piece of 3M blue tape will last about 30-50 applications before it starts to fail if you carefully keep it clean.
The lag testing software runs on Linux but I provide an entire bootable disk image so no configuration or installation is required. For that reason very little understanding of Linux is required; you just need a few single-word commands that I print out each time you power up your PI.
Want to buy one?
I am taking orders and have parts on hand for immediate shipment. All orders include the same hardware, but the price varies depending on how you want the software to be provided. Because I had to customize the OS configuration, I have to ship an entire OS image for your PI. The cheapest option has you downloading the software and writing it to a spare microSD card yourself (this costs $40 for US residents). Or if you prefer I can write the OS to a MicroSD card and provide that with your order (this costs $50 for US residents). International residents have the same two options, but I have to charge an extra $15 for shipping (I'm sorry, but international shipping is expensive!).
All versions of the Pi are supported, and the cheapest one (pi zero) works as well as the more expensive Pi3 for all resolutions up to 1080p. A Pi4 is required if you want to test above 1080p (ie 4k).
All versions of the Pi are supported, and the cheapest one (pi zero) works as well as the more expensive Pi3 for all resolutions up to 1080p. A Pi4 is required if you want to test above 1080p (ie 4k).
Once you get the hardware use the following links (aka the online manual) to learn how to use it:
There are also some videos of the lag tester. This one shows the hardware and light sensor placement.
Comments
I was looking for an affordable solution to test my AV equipment for input lag, currently consisting of a Yamaha RX-V1073 AVR and my Panasonic VT60 plasma TV. Specifically I wanted to see whether or not using the Yamaha would introduce any additional lag. Which it fortunately didn't as these kind of things would drive me nuts.
I bought the "download" version, the setup process is fairly easy, you just download the image from the guide here: https://alantechreview.blogspot.com/2020/08/pilagtesterpro-getting-started-guide.html and follow the instructions. Using the manual https://alantechreview.blogspot.com/2020/08/pilagtesterpro-users-guide-for.html I was able to get all my tests I needed in a short time. So if you don't mind using a Raspperry Pi (don't worry, you can't really do anything wrong) and don't care about a nice case, I definitely would recommend it for anyone looking for a lag testing solution, as it gets the job done perfectly and you have tons of options like testing with different resolutions.
It could be done. But not directly. This device requires that the display being tested shows the output of the Pi. Normally a smartphone cannot act as a display. If it can be made to do so, then it would work fine with the piLagTesterPRO. Perhaps some phones do have a way to to this that I'm not aware of via some kind of USB OTG HDMI IN adapter, but there's another option that all smart phones support: the camera.
But take a deep breath, it's not going to be simple.
The way it would work is to connect the pi to a regular computer monitor. Then point the phone at the monitor, and finally put the piLagTesterPRO sensor on the phone itself. This will obviously overestimate the lag of the phone because it's going measure the lag of the display, the lag of the camera, and the lag of the phone display simultaneously.
The lag of the monitor can easily be measured, however, using the piLagTesterPRO, so that can be subtracted. The lag of the camera is harder to measure, but there are techniques using mirrors or LEDs that should do the job, especially if the phone supports video out over OTG HDMI OUT (many do).
At that point if you subtract out the monitor lag and the camera lag all that will be left is the phone's screen lag.
Not the easiest process. I don't think there's anyway other way, however, whether using the piLagTester or any other lag testing tool.
I know to normally measure these things would require a Photodetector and Oscilloscope.
I have multiple monitors, so I'm guessing I could have your setup hooked up to one of my secondary monitors, while the sensor is instead taking readings from my Linux/Windows PC screen.
I wouldn't in effect have the sensor placed on the screen with the blinking white squares, except to view the data. My plan is to measure the same static image on both Windows and Linux to see if there is some sort of Flicker/Dithering effect happening in Linux, but not on Windows that's causing my eyestrain.
If the issue is some sort of dithering, where neighboring pixels are quickly alternating back and forth, would this simple Photodiode be able to pick up such small subtle light changes at the pixel level?
Thanks again!